Showing posts with label Baking. Show all posts

Sunday, November 2, 2008

Christmas Baking:Cherry Bonbon Cookies

November 1st marks the beginning of the Christmas baking season for me. I tend to give away a lot of baking at Christmas. I have fond memories of baking with my Grandmother and my Mom and its a tradition that I hope to carry on with my own daughter.

I start baking in early November and freeze it until its time to give it away in mid December. Most cookie recipes will freeze quite well for up to 3 months. You can even bake and fully ice cupcakes and freeze them. A thaw overnight in the refridgerator and they are just like fresh baked.


I will share with you some of my Christmas recipes over the next few weeks as I "countdown to Christmas". I always start with an old staple - this year it was Tollhouse Cookies - the classic chocolate chip cookies. That recipes already on my blog so I'll share tonight's recipe: Cherry Bonbon Cookies. These are really easy to make and have an elegant look to them so they're perfect for that special cookie tray.


Cherry Bonbon Cookies

Ingredients:
1 cup unsalted butter, at room temperature
1 1/2 cups icing sugar, sifted
4 tablespoons milk
2 teaspoons vanilla extract
3 cups all-purpose flour
1/4 teaspoon salt
48 maraschino cherries (stemless, in syrup

Glaze:
1 cup icing sugar
1 tablespoon butter, melted
2 tablespoons maraschino cherry juice


Preheat oven to 350•F.


In a large mixing bowl or stand mixer, cream butter and sugar until smooth and creamy. Add milk and vanilla. Mix the flour and salt together and add 1 cup at a time to the creamed mixture, beating well after each addition.

Shape dough into one-inch balls. For uniform balls, use a small cookie scoop (it resembles a miniature ice-cream scoop).

Flatten the ball on the palm of your hand and place a cherry in the middle. Pinch the dough around the cherry and re-roll it between your palms to form a ball again. Place balls on cookie sheet lined with parchment paper or Silipat mat and bake for 18-20 minutes until the bottom is lightly browned. The tops will still be quite pale. Cool cookies on wire racks.

Combine the icing sugar, melted butter and cherry juice together and mix until smooth. You can drizzle over the cookies with a fork, or put the glaze into a pastry bag fitted with a small plain piping tip. Alternatively you can use a zip bag with tiny bit cut off the corner. Pipe the glaze over the cookie and let set.

Enjoy!

Tuesday, June 24, 2008

Tuesdays with Dorie - Mixed Berry Cobbler

Today's Tuesdays with Dorie recipe was selected by Beth from Our Sweet Life. You can find the recipe for this classic dessert on her blog.

I am not a fan of berry desserts and since our berries aren't in season quite yet I decided to use a substitute fruit combination in this cobbler. My sister-in-law had just presented us with a large (very large) bag of fresh rhubarb and so I thought a rhubarb-peach combination might be just the thing for this recipe.

Other than the fruit, I made few substitutions or changes to Dorie's recipe. I did add a touch of cinnamon and nutmeg to the dough and used brown instead of white sugar (mostly because I couldn't find the new bag of white sugar I just bought!!!). In the fruit mixture I increased the sugar quite significantly because I was using rhubarb and I used half brown/half white sugar there (found the bag at last...).

The crust was very thick over the fruit and I wasn't sure how that would turn out. I have to admit that I don't make a lot of cobblers. It's a lot more popular to make crisps in this part of the country so I wasn't sure what to expect. The cobblers I've made in the past have been biscuit cobblers where you kind of dollop the dough on top of the fruit randomly. In any case, I gave it a go and popped it in the oven.

I love Dorie's recipes but I swear her oven must be much less hot than mine. I consistently find that the time's posted in the recipes are far too long for my oven. I either have to decrease the temperature or decrease the time. If I'd cooked this for 75 minutes it would have been burnt to a crisp. As it was, at 50 minutes it was toasty brown.

From a taste perspective, this was lovely. The outside of the crust was wonderfully crisp and the part on the inside by the fruit was soft and doughy. The fruit was just the right sweetness and I'm glad I added a little cinnamon for that extra "oomph". My husband really enjoyed it and he doesn't like rhubarb that much. He wants me to make the crust again with a different fruit combo and for him to make that request is pretty significant. My only complaint was that the fruit was a little too liquidy. I think I would add more starch to the mixture in the future.

Check out the other wonderful concoctions by the Tuesdays with Dorie crowd.

Friday, April 25, 2008

Tangy Lemon Bars

Here's a recipe for lemon bars that I quite like. I think I have about five recipes for lemon bars that I seem to rotate through and they are all a little different. This bar has a rich, shortbread crust and a tangy lemon custard on the top.

Lemon Bars

1 cup butter, at room temperature
1/2 cup sugar
2 cups flour
4 eggs
1 1/2 cup sugar
2/3 cup freshly squeezed lemon juice (about 3-4 lemons)
grated zest from 2 lemons
5 tablespoons flour
1/2 cup powdered sugar

Preheat your oven to 350•F.

Chop butter into small pieces and mix together with 2 cups of flour and 1/2 cup of sugar. Blend with a pastry blender or your fingers until mixture resembles soft crumbs. Press into the bottom of an ungreased 9x12-inch pan.

Bake the crust for 15-20 minutes in preheated oven until set and golden.

In another bowl, whisk together 1 1/2 cups sugar and flour. Whisk in the eggs, lemon juice and lemon zest. Pour over the baked crust.

Bake for 20 minutes more. Cool on wire rack. When bar is completely cool, sprinkle with a generous layer of powdered sugar.

Yield: 24 bars

My mom really enjoyed these but she did complain that the crust was too thick - which made sense because she didn't have a 9x13-inch pan so we used a slightly smaller one. The crust is very rich so you don't want it to be too thick. Also - eat these at room temperature as the butter in the crust seems to harden up in the refrigerator and they don't taste as nice. This is a great bar to have English style with a hot cup of afternoon tea!

I picked up two fabulous baking books today and can't wait to get started on some of the recipes.

The first is Baking: From My Home to Yours by Dorie Greenspan. The rcipes look amazing and she includes lots of fabulous hints on how to get the best results.


The second book is called Small Batch Baking by Debbie Nakos. I thought this would be a fun book to try because as much as I love baking and giving it away to folks who will appreciate it, sometimes I just want to make a special dessert for me and hubby without all those leftover temptations lying around...well...tempting me.


Wednesday, April 23, 2008

Favourite Baking Blogs

Hello and happy Wednesday! I wasn't able to get to my usual baking today because of the day's activities but I promise to share my lemon bars recipe with you tomorrow. Instead, tonight I thought I'd post some of the fabulous baking blogs that I frequent. There are some really outstanding bakers out there sharing their amazing and creative recipes with us. Check them out when you have a chance and make something sweet this week!


Alpineberry
Bake or Break
Bakerella
Cookie Madness
Canadian Baker
Tartelette
A Whisk and a
Spoon

Baking Bites
Baking and Books
The Cupcake Blog

Wednesday, April 16, 2008

Mango and Cream Muffins

Today's recipe is for muffins! I love muffins, especially warm from the oven - they remind me of winters in my grandma's house. Muffins make especially nice gift baskets for someone who has had a not so great day.

Mango and Cream Muffins

1 cup cream cheese, softened
1/4 cup sugar
2 cups flour
3/4 cup sugar
1 package instant vanilla pudding
2 tsp baking powder
1 teaspoon salt
1/2 cup water
4 eggs
1/2 cup vegetable oil
1 cup sour cream
1 teaspoon vanilla
1 cup mango (fresh or frozen), diced
1/2 cup dried mango, chopped

Heat oven to 350•F. Line 18 muffin cups with paper liners and set aside. You may also grease the inside of 18 muffin cups if you don't want to use liners.

Cream together cream cheese and 1/4 cup of sugar and set aside.

Blend flour, 1 cup sugar, instant pudding, baking powder and salt together in large bowl. Be sure to blend thoroughly to distribute the baking powder.

Whisk together water, eggs, vegetable oil, sour cream and vanilla. Pour liquid ingredients into dry ingredients and mix together with wooden spoon. Combine until just mixed together. The batter will be lumpy. Stir in fresh and dried mango.

Fill muffin tins about 1/2 way. Put 1-2 teaspoons of cream cheese mixture on top of muffin batter. Top with another dollop of batter so that the muffin cups are about 3/4 full. Bake at 350•F for 25-30 minutes. The top of the muffin should spring back when pressed.

This recipe makes about 1 1/2 dozen muffins.

*If you can't get or don't like mango you could easily substitue fresh/frozen peaches and dried apricots for the mango.

I will post a picture when my camera batteries have finished re-charging! LOL.

Tuesday, April 15, 2008

You Gotta Try This...

Okay. Tell me this isn't the cutest little hat! I knit this today for my darling daughter who turned 6 months old! I call her my little pumpkin because she was born in October and I've been dying to knit her a little pumpkin hat for ages but just hadn't gotten around to it. I'll try and post a picture of it with her actually wearing it but right now she's fast asleep (thank goodness for small miracles...)

I apologize that Bloglift Tuesday is not quite finished yet so I will post it tomorrow. Hubby was a sicko today so I had to spend the majority of my day upstairs taking care of the two "babies" instead of fooling around in the ol' craft room.


Had to share this with you: http://bakerella.blogspot.com/2008/04/make-your-cupcakes-pop.html. I think I'm going to try this for a "Take on Tutorial". I absolutely adore these! They are super cute and would make a lovely little bite size dessert for a little girls birthday party or a baby shower or just about any other occasion you could think of.

Thursday, March 13, 2008

Edumicate Me Thursday - Better Baking Tips

So, I had planned to do a tutorial on getting more use from your punches and diecuts today but unfortunately, life got in the way. Instead I thought I'd post my top tips for better baking - my first non-craft related Edumicate Me Thursday!

I need to qualify these tips by telling you that I'm not a professional baker or an expert of any kind. These are just some things I've picked up over many, many years of baking (I first started baking with my Grandma when I was about six...). Each of these "rules for better baking" will have exceptions, so my best advice is trust yourself and your own experience and be willing to make a few mistakes - you will never get better without a few sunken cakes and burnt cookies. Believe me, I know!

Tops Tips for Scrumptious Baking

  1. When it comes to ingredients, buy the best quality you can afford. Now I'm not saying that your cookies and cakes won't turn out beautifully with no name brand chocolate chips, but when it comes to baking ingredients, quality often does count. This is especially true when you are making recipes with very few ingredients. A classic example of this is a ganache - which has only two ingredients - chocolate and cream. You can make a lovely ganache with the chocolate chips hiding in the back of your pantry but you will find that a quality chocolate (like Callebaut or Ghiradelli) will make a ganache to die for.
  2. Always, always, always use real butter unless the recipe specifically calls for another fat (such as vegetable shortening, lard or oil). There is no substitute for butter in baking - margarine just does not cut it. There is a quality in butter that makes for melt in your mouth cookies and tender cakes that no other fat can provide.
  3. Use unsalted butter unless the recipe specifies otherwise. I found this out a bit late in my "baking career" myself and I tell you its made a world of difference to many of the recipes I bake most often. Sometimes the combination of salted butter, plus salt, plus baking soda (common ingredients in many recipes), can make for a sweet treat that is a little too much on the salty side. Use unsalted butter and you will find the flavour is more balanced. If you've previously used salted butter in all your baking you might find this a bit of an adjustment but try it out - I'm sure you'll like it.
  4. Unless you are a very experienced baker, follow the recipe. This may seem obvious but its important to note that baking is a science whereas cooking is more of an art. Baking is kind of like chemistry with all the ingredients working together to raise your cake or crisp your cookies. Fiddling with the ratio or ingredients can have disastrous results. Go ahead and exchange your chocolate chips for peanut butter chips, or walnuts for pecans, but be careful about exchanging one flour for another or using canola oil in the place of butter. Even substituting whole wheat flour for white can have a significant impact on the final product.
  5. Test the temperature of your oven. No two ovens bake at the exact same temperature no matter what the dial or digital read out says. Its important to know if your oven bakes hot or cold so you can adjust temperature and cooking time to compensate. I know that my oven bakes hot so I drop my temperature and/or reduce cooking time to make sure that my baked goods come out brown and not black around the edges.
  6. If you invest in one baking item in your lifetime - make it a standing mixer. Although pricey, this is one of the best things a frequent baker can own. There are many recipes that call for 5-10 minutes of constant mixing at a high speed - something that is difficult with a hand mixer. Try making royal icing with a hand mixer...be prepared for a sore hand afterwards. I got mine as a wedding gift and I don't know how I lived without it. They come in a range of colours, sizes and prices but buy the biggest one you can afford - you will not regret it.
  7. Use liquid measuring cups for liquids and dry measuring cups for dry ingredients. It may seem a small thing but it will make your baking easier - believe me. I have several sets of dry measuring cups and three different size liquid cups. It keeps me from having to wash and dry them if I'm using many ingredients or baking more than one recipe at a time.
  8. Use a scale for measuring dry ingredients. Sometimes a recipe will call for 1 pound of icing sugar. You might think great - that's four cups - but often the measured dry weight of an ingredient will be different from its cup measurement. This can have a significant impact on certain recipes. I find that particularly with frosting, I prefer to weigh my ingredients rather than measure them in cups. In English cookbooks you will often find the ingredients listed by weight rather than in cups and tablespoons.
  9. Baking is not diet food. I know a lot of people will disagree with me on this one and I do not want to discount the wonderful low fat/low sugar recipes that are out there - I've had a number of tasty ones myself. However, if you are really craving a piece of rich chocolate cake, a moist and creamy cheesecake or a crisp and delicate chocolate chip cookie - indulge yourself and your family and make one with real, non-diet food ingredients. You will not be satisfied with the low fat versions of your favourites and they are often more difficult to bake successfully because of ingredient substitutions. Instead, have your favourite baked goods as a once in a while treat - which is what they should be anyway. Everything in moderation!
  10. Bake with love. This probably sounds stupid but I really, honestly believe that this is the key to successful baking. If you don't really like to bake - buy or exchange it with someone who does. I had a unique experience once that really brought this home for me. One Christmas a girlfriend who really hated baking, asked me to help her make 12-dozen lemon bars for a cookie exchange she was participating in. Why a person who hates to bake would join a cookie exchange is beyond me...but that's where we found ourselves. She came to my kitchen, armed with the ingredients from a list that I had given her, used my baking utensils, my oven and my recipe. We both made six batches of the same recipe. Despite everything, hers turned out terrible. They were tasteless, or burnt or something else went terribly wrong with them. It was the weirdest thing and I couldn't quite figure out what she was doing differently from me. In the end I think it was just that she really didn't enjoy doing it.

Anyway - those are my top ten tips. I hope you find some of them useful. I would love to hear about your favourite baking recipe!

Wednesday, February 27, 2008

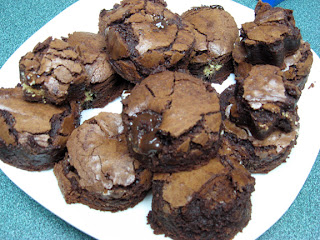
Mint Meltaway Brownies

Okay...I've come to the conclusion that some parts of me were born to bake. Unfortunately other parts of me were born to eat and the two just don't go well together. Since I've joined Weight Watchers to take off those baby pounds (who am I kidding - I needed to lose weight before baby came along...), I've decided that to indulge my baking obsession I needed to find someone to give it away to. Normally that would be my office gang but as I'm on maternity leave right now I've shifted my sugar pushing to my husband's office. On Wednesdays I bake and on Thursdays my husband gets to be the little cookie faerie at his office. So here's today's concoction...

I've done a lot of baking with those little miniature peanut butter cups as both my husband and my mother enjoy them quite a bit. However, my favourite sweet flavour combo is chocolate and mint and when I saw these little mint chocolate cups at Superstore the other day...I couldn't resist.

Mint Meltaway Brownies

8 oz unsweetened chocolate
1 cup unsalted butter
5 eggs
3 cups sugar
1 tsp vanilla
1 tsp salt
1 1/2 cups flour
1 package of mint chocolate cups (I've seen similar items at Walmart or you could probably use miniature York Peppermint Patties)

Preheat oven to 375° F. Grease 13x9-inch pan. Optionally, you can line the pan with parchment paper.

Melt chocolate and butter over low heat (be careful not to burn) and set aside.

Beat eggs, vanilla and sugar together on med-high speed for 10 minutes. This will create a thick, yellow creamy mixture. Ten minutes is a long time and is not necessary for the success of these brownies - but if you have a standing mixer let it go for the full 10 minutes. Add the chocolate mixture, flour and salt and beat just until all ingredients have been incorporated and the batter is a uniform chocolate colour.

Pour into prepared baking pan. Arrange mint cups on top of batter and push into the batter. The batter may not cover them initially but it will bake over them in the oven. Bake for 35-40 minutes. Remove from oven and place on rack to cool.

When cool cut into squares or make shapes with a deep cookie or biscuit cutter. Enjoy!

This is a rich, fudgy brownie. The basic recipe can really be used for any brownie combination. Add nuts, chocolate chunks, miniature peanut butter cups or anything else your little heart desires.