I will warn you that this tutorial is long. I wanted to do a card that incorporated a lot of different techniques for a shoebox swap I'm doing tomorrow so I thought I would "document" its making for the benefit of the other participants. Since I took the photos I may as well post the tutorial to my blog as well.
This card uses three main techniques: scoring, colouring with Copics and glitter masking.
For this card you will need the following items: card base (5.25 x 10.5) scored in centre, card front (5x5), coordinating patterned paper (4.75 x 3 - it will be trimmed later), scraps of white and coordinating cardstock for card front, glitter (transparent base colour and coordinating opaque colour), scoring tool (I've used a scor-pal here), corner punch , stamp of choice, Copic markers (you can use another colouring medium if preferred), embellishments and ribbon of choice.
 Cut your card base, cardstock and patterned paper to size. Score your card base in the centre and round the two bottom corners (the fold should be at the top). Use your scoring tool to score a 1/4" border around all four sides of your card front.
 Turn your card front 45 degrees and score down the centre and every 1/2 inch in either direction. Start and stop each diagonal score mark at the 1/4" border score lines (don't go all the way to the edge).
 Turn your card stock in the opposite direction and repeat the score lines every 1/2".
 Your card front piece should look like this when you're finished scoring all the lines. You may want to go over the 1/4" border lines once again once you've finished the diagonal lines. When you have finished scoring, round the two bottom corners of the cardstock.
 Select your stamp and find the appropriate sized Nestability to go with it. I usually just put my stamp on the table and hold my dies over it until I find the right size one. You want a size that fits your stamp but that doesn't leave an excessive amount of white space around it. Keep in mind that if you emboss the inner edge that will reduce your stamping space. Also pick out the "matching" scalloped edge die at this time. Die cut the rectangle from white and the scalloped rectangle from a coordinating piece of scrap cardstock with your preferred die cutting machine. (I use a Revolution but a Cuttlebug or Wizard are both perfectly good for Nestabilities)

 Because I'm using a pre-cut piece of cardstock to stamp my image, I always use a stamp positioner to ensure that I get my stamp centred on the cardstock. This is not an issue if you are using clear stamps, but for wood mounted stamps these systems are a life saver. There are several different kinds on the market but essentially they all include a flat, clear piece to stamp your image on and a corner piece to push your stamp into. Put your stamp in the corner tightly and stamp down on the flat portion. Then you position your flat portion over your cardstock until the image is in the right place. Once its positioned, fit the corner piece in next to it and remove the flat piece. Be careful not to either move the corner piece or the cardstock. I often tape my cardstock down with removeable adhesive to avoid jostling it by accident.
 Make sure that your stamp is butted into the corner of the stamp positioner again and stamp straight down onto your cardstock. And there you have it, a perfectly placed stamp.
 These are the Copic markers I have used for the next section: Colouring the stamped image. Additionally I have used a blender pen (0) and two shades of grey.
 Now for the colouring. There are probably as many different ways to colour with Copic markers as there are Copic owners so I will show you the way I do it for the purpose of this tutorial. I always start with the lightest colour and fill in the entire section to be coloured with that light colour. In this case I am using YG11 here.
 Next I will add the next darkest shade I plan to use to create the shadow areas. A lot of Copic tutorials talk about defining your light source - where your light is coming from. This is important to determine where the lightest and darkest shades of colour will be on your image. In this case my imaginary light source is coming from the top right corner above my turtle. However, remember that shadows also should fall where one element of the image is in front of another. In this case the shell of the turtle is "shadowing" the tops of the turtle's legs and the head of the turtle is "shadowing" the turtle's neck. Make sure to add the darker colour to those areas as well.
 Although not required, I have added a third, darker shade to this image to define the darkest areas of shadow - the tops of the legs under the shell and the very top of the turtle's neck.
 Finally, take your lightest shade and colour over the entire area again to blend the three colours together. I usually do this with a circular motion of my marker. You can go over the area as many time as your require to blend the colours to your liking. Its hard to go wrong with these markers so don't worry about over-applying the colour.


 Here's another example of colouring with the frog part of the image. Remember, the light source should be the same for all parts of your image. I recommend that you use at least two colours for each large area which are several shades apart. Don't use colours really close together or you won't get good shadow definition.
 Continue colouring in each part of the image and shade as you go. Your final image should look something like this.
 A final step in the colouring process is to "ground" the image using a shadow of some sort. This helps to prevent that look of the image just floating on a white background. I use two or more shades of grey to great a free form shadow under the image. Use the lighter colour to create your shadow, then use a darker colour very close to the image. Afterwards blend them together with the lighter colour. You can also feather the edges of the shadow by blending them with the blender pen so they fade into the cardstock without a defined edge.
After you have finished colouring your image, adhere the white rectangle to its matching scalloped rectangle. I've opted to "pop" mine by using a dimensional adhesive but that is completely optional.
 The next step in this card is to create the sentiment and sentiment background which will go on the bottom part of the card. I am using a piece of 4.75" x 3ish" patterned paper for my sentiment piece. This glitter technique requires that you have some diecut letters to mask off an area of the background. I recommend that you take the letters you plan on using and place them on the paper to ensure you have enough space. I'm using Quickutz Cookie Cutter dies here (Rockstar) but you can use any letter dies (Cuttlebug, Sizzix) for this technique.
 Place a piece of double sided tape over your patterned paper and press down to adhere securely to the paper. Take a SPARE piece of tape covering (don't use the one from the piece of tape you've just adhered as you will need it later), and die cut your letters from the tape cover. You must use the tape cover and not another material because its important that the letters do not stick to your tape permanently.
 Remove the tape cover from your patterned paper and set aside. Place your diecut letters carefully on top of the tape in the position you want them. DO NOT TOUCH THE TAPE WITH YOUR FINGERS!!! The oils from your hands will prevent the glitter from sticking to the tape. Use tweezers or a Quickutz tool to carefully place the diecut letters.
 Gently place the piece of tape cover you put aside back on the paper and rub to press the letters into the tape so they don't fall off when you apply your glitter. Be careful not to touch the tape with your hands.
 Remove the tape cover and apply the clear/transparent glitter (here its Glitter Ritz warm highlight) over the entire surface of the tape. Pick up the piece and gently tap off the excess glitter. I do this over a piece of paper so that I can tip the leftover glitter back into the glitter bottle.
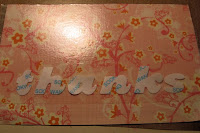
 This is what you will end up with. The transparent glitter will highlight the paper while still allowing the pattern to show through. Where the diecut letters are there is still bare tape so you can apply your next shade of glitter. Remove the diecut shapes carefully with tweezers and apply your next shade of glitter (I used Glitter Ritz orange). Tap off the excess and use a makeup brush to brush any stray pieces. Pour the remainder back into the bottle.
 This is what your glittered piece will look like. Use the tip of your finger to rub or burnish the glitter to a nice shine. Don't worry about rubbing it off - it will stick well to the double sided adhesive.
 Trim your paper to just the glittered portion and use a corner rounder to round the two bottom corners
 Adhere the patterned paper sentiment to the bottom of the scored cardstock front.
 If desired, add a ribbon to the top of the patterned paper. There are probably a million ways to tie a ribbon on a card but this is how I do it. Run a line of adhesive across the area where you want to attach the ribbon. Leaving a slight overhang on each end, secure the ribbon and bring the excess into a loop above where you want your bow/tie to be. Clip the ribbon in the middle of the loop. Tie into a knot or bow and secure the overhang on the back of the cardstock with adhesive.
 This is what it will look like.
 Adhere your card front to the card base and then add your stamped image. Embellish as desired. On this card I've used Prima flowers with Dew Drop centres.
Supplies: Cardstock (Prism, PTI, Bazzill), Patterned Paper (Chatterbox) Ink (Adirondak), Nestabilities, Quickutz (letter dies), ribbon, Prima flowers, Glitter (Glitter Ritz), double sided adhesive, Dew Drops, Copic Markers, Scor-Pal, corner rounder.


 I went to my LSS today to pick up a very specific item - large chipboard snowflakes. Darned if I could find them but I'm glad I asked the ladies there because they suggested that I use the diecutting machine and make my own. Well, I guess I've been living in the dark, because in all the years I've been papercrafting, I've never used the big Ellison diecut machines in the LSS. In any case, I bought a bunch of grungeboard (if you've never seen this stuff -check it out - very cool) and cut myself a bunch of nice snowflakes. I was very impressed.
  The grungeboard has subtle patterns embossed into it so its pretty fun stuff. You can ink this up with your stamp pad or paint it as I did to give it some colour. Colour it to match your project - its quite versatile that way. I'm using Adirondak dauber painters. Once you've painted them, leave them to dry while you work on the rest of the card.
 For the glitter masking you will need a piece of cardstock about 2.75 x 5.5 inches and some double sided adhesive tape to cover it. This is scor-tape. You can purchase it from the Scor-pal online store. Put the tape onto your cardstock and press it down. Leave the cover on for now.
 Cut out your mask images from another piece of tape cover using punches or die cuts. I'm using a variety of snowflake punches and small circles from my hole punch. Its important to use the tape cover for this step so they don't stick to your tape.
 Peel off the tape cover and lay down your design using your cut out shapes. DO NOT TOUCH THE TAPE with your fingers!!! If you do, the oils from your hands will make it not so sticky. Use tweezers or other tools to place your images. You do not need to press them down - just lightly place them on the tape background.
 Lay down your first layer of glitter. This will be your background colour. I'm using silver Glitter Ritz glitter. Once you have your background colour down, brush off the loose glitter using a makeup brush and pour back into the jar. Then peel off the next layer of images to put down your second colour.
 I'm using Gunmetal Glitter Ritz glitter to create a shadow effect behind my snowflakes (which will be the foreground colour). This is quite subtle but adds a bit of dimension to your background. Brush off excess as above and peel off your final layer of images.
 The last layer I put down was white Glitter Ritz glitter. Here is how the final background looks once the excess glitter has been brushed away. Be sure to burnish your glitter by rubbing your finger over the entire surface. That will really make it shine.
  Make yourself a base card of 8.5x5.5" cardstock folded in half. Trim your glittered background to 2.5" and add a navy or dark blue cardstock mat to it (3x5.5"). Glue to the card front. Use glue dots to attach your large snowflake and then use a pop dot or foam square to attach another snowflake on top. I added a few spots of glitter to my large snowflake with a glue pen and then a clear rhinestone to the centre of the small snowflake. Add a sentiment and you're done!


